… to Maclandia. We’ve replaced our Linux and Windows pcs with Macbooks. The world is a scary but shiny new place. We also upgraded our NAS to 4 TB. It’s taken me a couple of weekends, but I’ve finally gotten all my files moved, various tools installed, and a full range of backup provisions configured. I’m mainly putting everything down here so that I can remember all the steps for setting up B’s tools and backups and also in the event of harddrive armageddon.
First lesson
Finder doesn’t play nice with my old workflow. In the past, I would sometimes put a working folder in my Dropbox, and then when the project was finished, copy it back into my home working directory. Windows had a nice way of merging or updating the changed files, prompting me if a file already existed. In Mac OS, I learned quite quickly that if you copy a folder over an existing folder of the same name, it will delete the old contents and replace all the files with the new contents. As a result, I will need to become proficient with rsync and the terminal to do this merging effectively. [NOTE to self: Figure out the correct options/commands and post here.]
Setting up a new backup or redundancy plan
When I lived in PClandia, I never backed up my entire OS, based on the philosophy that if something happened to my harddrive and/or OS, I would want to reinstall my entire OS anyway (esp. since Windows tends to get bogged down over time with installs and uninstalls, registry edits, etc.). My old strategy was to back up an exact copy of my user folder (within which all my user profiles, data files, and copies of downloaded software, etc.) to our NAS (RAID 1, 2TB) drive, and then have automatic backups run to a 3TB USB connected drive nightly. I’m still not sure about all the backup lingo, but I essentially had it set up so that the NAS was a mirror copy (including deletions of my pc) but the USB backup would not delete any files but add new copies/modifications to the drive, renaming the old versions of files that had been updated.
A couple of things prompted me to rethink this strategy now that I live in Maclandia. First, there’s Time Machine. I understand it can be buggy, so I don’t want to rely on it alone. At the same time, if there were a hardware failure, it would be nice to be able to just reload everything to a new machine (and since Mac OS doesn’t have the bogged down with time/installs problem of Windows – or so I’m told – then I might not want to reinstall everything). This means I wanted to set up TM on the NAS, but also have my data backed up the old way, too. I want my home directory backed up separately in the event that my OS gets corrupted (again, remember, I’ve lived in PClandia for a long time), I can easily reload all my data to a new OS install.
My strategy
I created a user share on my NAS for my TM backups based on these instructions. I had initially used the built in TM features of the NAS, but got a couple of errors (e.g., the TM had problems ‘verifying’ the backup and then would start a new one) when we were trying to back up 2 MBPs to the same TM share. Rather than try to troubleshoot, I figured it might be safer just to keep them in separate NAS shares anyway. [Downside: In my version of NAS firmware, there’s not an option in the user interface to apply a quota to these user shares, though I can see a user quota file in the admin directory that I can probably edit to apply a quota. So, that’s a to-do item.] These TM backups won’t be backed up, since they are the backup.
Then, I set up rsync + Automator to backup my user home folder to another NAS share nightly. Right now, I followed these simple instructions. The downside of the simplicity is that it doesn’t create a log file or email me the status of the backup, or errors. It looks like these more complicated instructions would do that, but I think I’m going to see how the simple version works for a bit before tinkering with it. I’m also still using the NAS’s backup tools to do an incremental backup to the USB drive like before.
Off-site backups and access to files from iPad
In addition, I want to save my work files offsite and also access them from the iPad. I have two options here: my backups user on Dreamhost (50GB) and/or Dropbox (free 5GB or paid 100GB). This got a little complicated because I also wanted to integrate Zotero (on MBP) and iAnnotate (on the iPad) into my workflow.
Zotero will only allow you to sync your library using either their service (not enough space) or via WebDAV. My Dreamhost backups storage doesn’t support webDAV. I tinkered around with some options (e.g., storagemadeeasy) to turn either my Dreamhost or my NAS shares into WebDAV folders. But, then, I learned that Mac OS doesn’t play well (or at least easily) with WebDAV, so I abandoned that strategy. Also, though my NAS has an iPad app and related tools to be able to access files remotely (via an encrypted tunnel and using a myCloud app), in practice, they haven’t worked seamlessly or at all.
At every turn, it seems that Dropbox was the only solid solution. Since I’m tired of moving files around to not fill up my free space, I’ve resigned myself to paying for Dropbox storage. Seems silly because I have lots of storage at home and 50GB at Dreamhost and I can get them to work together with lots of ad hoc tools and arrangements, but in this instance, I decided that convenience and reliability was more important than cost. Also, I’m really good at rationalizing money spent on technology.
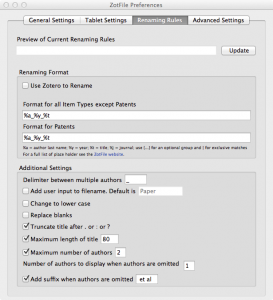
I set up Zotero with my data directory in my home folder, but my document folder in my Dropbox. My group library files are synced using the Zotero service. I also have copied these to my personal library as separate collections. I installed the ZotFile plugin to manage the documents. It took some back and forth and tweaking to get the settings right, so I’m going to put them all here for future reference.


[In the process of researching how to do this, I consulted these sources, which all had some part of the necessary information. [I did try to get things set up with Zotpad, but it kept crashing and wouldn’t work. Maybe someday there will be an updated, stable version.]
For now, the Zotero + iAnnotate workflow will do what I want (though if Zotpad worked, it would be closer to the ideal). The goal is to keep a library of original .pdfs and also copies labeled _md.pdf that have been annotated. The tricky part is making sure both versions are linked to the Zotero database, which is what the Zotfile “send to tablet” features do within Zotero. [Zotpad would do this at the tablet, rather than in Zotero, but since it doesn’t work, it’s not really an option.]
Essentially, when I add .pdfs to entries in Zotero, I also need to send them to the ipad folder (highlight all items, right click, manage attachments, send to tablet). This makes a second copy of the file in the ipad subfolder within my Zotero document folder inside Dropbox. Then to read the file on my ipad, I open iAnnotate, use the Dropbox connection to browse to the ipad folder and read/annotate the file. When, I’m done, I can save the file back to Dropbox. Then, next time I want to write/cite, I open Zotero. Zotfile creates to special search folders that will let you see if you have any tablet files that need to be reconnected (Tablet files modified) to their parent items in the Zotero database. So, before writing, I open that search folder to get the annotated files from the tablet back into the database and main library folder (highlight all items, right click, get from tablet). The result is one library with both my original .pdf plus the _md.pdf annotated .pdf. Zotfile also copies all the annotations into the Zotero notes field, too, which is nice. Also, informally, I can treat the ipad folder as a to-read folder, for those times when I’m sitting around bored with my ipad and nothing to do. [<- Ha! That's what email is for. But, really, I'm never sitting around bored, and I never have nothing to do.]
It sounds a bit clunky, but actually isn't too bad if you just remember to send all new items to your tablet when you add them and then re-get them from the tablet the next time you open Zotero (hence the need for the full 100GB in Dropbox.... though you could set it up so just the ipad folder is in your Dropbox folder). The downside is that this workflow assumes a) you're adding items to your library from your pc (not tablet) and b) you always send new .pdfs to your tablet from Zotero+Zotfile standalone. [Again, if Zotpad worked, you could use it to do the linking of files to database tablet-side rather than pc-side, which would add the flexibility to add/edit Zotero library items on the ipad.]
One more off-site backup, just because I’m paranoid
My home folder is synced to my NAS, and then backed up to an external USB. My Dropbox folder includes all my work files, including .pdf library, and so everything is also synced to Dropbox. [My Dropbox folder also includes some other shared folders with Brian and others that are not part of my work directory.] Because my work files are the most important, I’ve also set them to back up (less my .pdf library) to the Dreamhost backups user using rsync and automator. If I worked at a University that provided secure data backups for faculty (ahem!), I could have tweaked these instructions to use that space. [If my university provided secure data backups + WebDav, I probably could avoid Dropbox altogether. (sigh)] Here’s the instructions I followed to backup just my work folder to Dreamhost, with a variation on the iCal/Automator step at the end:
http://www.commandlineidiot.com/2007/how-to-backup-your-mac-to-a-dreamhost-server-part-1-of-2/
http://www.commandlineidiot.com/2007/how-to-backup-your-mac-to-a-dreamhost-server-part-2-of-2/
http://esilva.net/2013/07/automator2/